Thursday, September 7, 2017

Glutinous Peanut Balls aka Loh Mai Chi or Peanut Mochi (花生糯米糍)


Some people call this snack/dessert the peanut sesame glutinous rice balls or glutinous peanut balls or loh mai chi or peanuts mochi. I occasionally make this as supper for my church friends when I attended the Saturday night group. This snack/dessert is really similar to the Japanese mochi but the "snow skin" is actually softer in texture as compare to the Japanese mochi. Honestly speaking, if you want to make this, you got to be very calm and patient especially when wrapping fillings like toasted crushed peanuts and sesame seeds.
https://bankertobaker.blogspot.com.au/2017/09/glutinous-peanut-balls-aka-loh-mai-chi.html


Now, about the making...

For the skin:
250g glutinous rice flour
2 cups of water 
100g sugar
1.5 tsp oil (optional)

For filling:-
300g toasted crushed peanuts
50g toasted sesame seeds
100g sugar (or castor sugar)

Flour for coating:-
80-100g rice flour 

Note: This recipe makes about 24-25 glutinous peanut balls

The steps:-
1) To make the toasted peanuts and sesame seeds, you could either place the crushed peanuts in oven or stir fry them until aromatic. (Note: Beware of burning the peanuts if not careful.) 


  • I usually pan fry the crushed peanuts and sesame seeds instead of placing them in oven. As I bought the cooked crushed peanuts, all I need is to stir fry them in an ungreased pan for maybe about 5-10min with medium low to medium heat until you could smell the nice aroma of the peanuts and sesame seeds.
  • Remove the fried / toasted peanuts and sesame seeds from heat. Leave it to cool for awhile before placing them in a container.
2) Once the toasted peanuts and sesame seeds are cooled, add in the castor sugar and mix well. Note: Do not cover the container with the lid until it is completely cooled.


3) Next, you could start making the skin for the glutinous balls. In a bowl, put in all the ingredients for the skin. Stir with a spoon until well mixed. Then, pour this liquid mixture into a lightly greased steaming tray and steam for about 30-35minutes with medium heat.


The look of the cooked glutinous rice dough skin

4) Once the skin for the glutinous peanut balls is cooked, remove it from heat and leave aside to cool.

5) While waiting, let's prepare the cooked rice flour for coating the glutinous peanut balls during the wrapping process. All you need to do is to place the rice flour in an ungreased pan and stir fry it for about 10-15 minutes with medium low or low heat until cooked. (Note: To test the flour, just touch some of the rice flour in the pan and feel it. If you feel that the flour is quite dry but smooth, then it is considered cooked. Do not stir fry the rice flour with high heat to avoid burning or browning the rice flour.)

I guess the hardest part for me is the wrapping process as I have not found any faster way to wrap the filling. And, if you are too greedy by placing too much of the filling, the dough skin might break and hard to be rescued...

The wrapping steps...
1) Removed the cooled glutinous rice dough from the steaming tray. Flour the dough with some cooked rice flour and cut it into squares ie about 2.5cm x 2.5cm each.

2) Take one portion of the dough skin, press slightly in the middle with your thumb to make a inverted bell curve.
3) Slowly put in a quarter teaspoon of filling and press it gently with your thumb. 
Note: If you feel sticky, flour a little cooked rice flour around the sticky skin part.
**Repeat this step 4 to 5 times with a quarter teaspoon of filling each time. Note: Total filling for each glutinous peanut balls is between 1 - 1.5 tbsp of filling. Do not place too much of filling as it might break the skin when sealing the dough ball.
** For easier sealing of the dough ball, hold the filling in place by gently pressing on it with one of your thumb while the other hand working on sealing the edges to make a round shape ball.
https://bankertobaker.blogspot.com.au/2017/09/glutinous-peanut-balls-aka-loh-mai-chi.html
4) To finish the process, coat the wrapped balls with some cooked rice flour before putting into a
container.
https://bankertobaker.blogspot.com.au/2017/09/glutinous-peanut-balls-aka-loh-mai-chi.html


Tuesday, September 5, 2017

Silky Tofu Pudding / Bean Curd Pudding (aka Tofu Fah / Fau Foo Fah 豆腐花 /豆花)

It has been such a long time since I updated my blog. My apology. Just been so busy with life from last year end as we moved from one suburb to another. There were lots of stressful events and I even hurt my coccyx. I was suffering from the tremendous pain for a minimum 2 months before I can stretch and run again. Anyway, thank goodness it is over. I will try my best to continue with my blogs as I wanted my boys to be able to learn the skills too!

https://bankertobaker.blogspot.com.au/2017/09/silky-tofu-pudding-bean-curd-pudding.html

Today I am going to share about the making of "tofufah / tau foo fah" which is a term in Cantonese, which means tofu pudding. This is a delicious warm dessert which served with sweet syrup ie. either coconut sugar syrup or white sugar syrup.

Now the recipe...

Traditionally, the main ingredient to make this dessert apart from the soya bean milk is the calcium sulphate (石膏粉) which is unhealthy. Now, if you google online, you probably can find alternate ways to make this dessert. 

Have you heard of GDL (Glucono-Delta-Lactone)? I heard about this from friends. I was looking high and low for recipes and I found some for your reference. Here's the recipe for an easy tofu pudding / tofu fah.
The pudding:-

2L soya bean milk (sugar free)
1 tsp of GDL
2 tsp of cornflour
250ml water
(Source: From social media)

OR 
1.5L soya bean milk (sugar free)
0.5 tsp GDL
1 tbsp. cornflour
75ml water
(Source: http://womensweekly.my/recipes/desserts/tau-foo-fah/)

OR
2L soya bean milk (sugar free)
0.75 tsp GDL
0.5 tbsp cornflour
2 tbsp water
(Source: https://wendyinkk.blogspot.com.au/2010/11/gdl-tofufah.html)

NOTE: 2L soya bean milk could make about 10-12 serve of  tofu fah (tau foo fah). For a family of 3-4, you may want to reduce the recipe by half  if you are using the first or third recipes above. However, if you don't mind having some balance of tofu fah, you can just use the above recipes.

Syrup:
3 slices of ginger 
1 piece of pandan leave
325ml water
150g white sugar (or coconut sugar) 

Since I used a ready made sugar free soya bean milk which I bought from the Asian Grocery here in Adelaide, this is how I made my tofufah....

Steps:
1) Place the soya bean milk in a pot. Bring it to boil.
2) Remove the "tofu skin" which appears on the surface while the soya bean milk was boiling.

3) When the soya bean milk is about to boil or just started to boil, quickly prepare the GDL/cornflour mixture in a separate bowl i.e. mix the GDL and cornflour into the water and stir well. (Note: I have tried the first recipe but I have not tested the rest.)
4) Place the GDL/cornflour mixture into the rice cooker (or you can use a thermal pot).
5) Then, hold the pot to about 15cm high, and quickly pour in the boiling soya bean milk into the rice cooker. If you see some bubbles appearing on the surface, gently (but quickly) remove them with a scoop or a spoon. Caution: DO NOT STIR after pouring in the boiling soya bean milk into the rice cooker with the GDL/cornflour mixture!
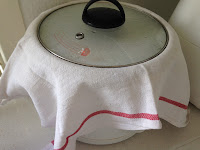
6) Next, quickly cover the rice cooker with a piece of clean cloth and place the rice cooker lid on top as per the picture below. Leave it untouched for about 30 minutes for the tofu pudding to set. (Note: I used the rice cooker's keep warm function when leaving the tofu pudding to set.) 
7) Moving on to the next step is to prepare the syrup. Place the syrup ingredients into a small pot and bring it to boil. When the syrup is boiling, let it boil to a couple of minutes until the water is slightly reduced. (Note: You can change it to lower heat when the syrup is boiling and let it simmer for a few minutes.) To test the sweetness of syrup, please do taste it to see whether it is sweet enough before you decide whether to add little bit more sugar. :) 
 
The syrup

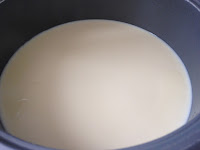
The look of the silky tofu pudding after it was set.

8) When the tau foo fah is ready, "thinly" scoop it into the serving bowls and pour in a few scoop of the syrup. 

9) Preferably, tau foo fah is eaten best when it is still hot/warm.

https://bankertobaker.blogspot.com.au/2017/09/silky-tofu-pudding-bean-curd-pudding.html
Silky tau foo fah is now served! Enjoy! :)