Sunday, November 27, 2016

Steamed Glutinous Rice With Chicken, Mushrooms and Chinese Sausages (Sticky Rice) (糯米鸡)- Loh Mai Kai

Do you want to learn this? The steamed glutinous rice with chicken, mushrooms and Chinese sausages, which also known as "loh mai kai" in Cantonese or some people called it sticky rice. The related photos have been sitting in my photo album for a week plus now. I just haven't got the time to arrange them properly for my blog post as I was caught up with many matters! o_O

Okay, let's go straight to the points..

Firstly, the main ingredients needed...
(1) 2 Chinese sausages (lap cheong 腊肠) - Note: Please remove the thin layer of the sausage skin.
(2) 10 Chinese black mushrooms
(3) 450g glutinous rice (to make 10 bowls of sticky rice ie. Loh Mai Kai)
(4) About 800g chicken breast fillet

DAY 1......

- The glutinous rice: Wash the glutinous rice and soak in water overnight.
- The mushrooms: Wash the mushrooms and soak them with about 1.5 cups of water until completely soft. (Note: I used 1.5 cups of water for soaking the mushrooms as I need to retain it for steaming the glutinous rice on the following day.) 
Note: Please do cover them with a pot cover or any cover so that no "tiny creatures" crawl in while you are resting. ;)

- The chicken: Slice the chicken fillet into thick chicken slices. Thickness depending on personal preferance, but not too thin nor too big pieces.

>> Put the chicken slices in a bowl. Then, when the mushrooms are soften, remove the mushrooms from the water and place them together with the chicken slices. Now, do not pour away the mushroom water. Please KEEP it for later use.

 *Setting aside the mushroom water for later use.

>> For the bowl of chicken and mushrooms, mix in....
- 2 tsp garlic powder
- 2 tsp sesame oil
- 2 tbsp light soy sauce
- 0.5 tsp white pepper
- 0.5 tsp salt
- 3 tsp sugar
- 1.5 tbsp oyster sauce
- about 2 tbsp Chinese cooking wine (Shao Xing)
- 1 tbsp cooking caramel
Use a cling wrap or any cover to cover over the bowl and place it in the fridge to marinate overnight.


*Marinating the chicken and mushrooms

DAY 2....


- Place the glutinous rice in a lightly greased steaming tray and pour in 1 cup of the mushroom water. (Note: I just use little cooking oil to grease the steaming tray.)
- Then, add in:-
- 1.5 tsp sesame oil
- 0.75 tsp (ie. 3/4 tsp) salt
- about 1.5 tsp Chinese five spice powder (*you may reduce this slightly if you do not like to have too much of Chinese five spice powder)
- 0.5 tsp white pepper
- 2 tsp sugar
- 2 tbsp oyster sauce
- 3 tsp soy sauce (light)
- 1.25 tsp cooking caramel
And use a spoon to stir the seasoning around until well mixed.


- Next, steam over boiling water for about 15 minutes with medium high heat. (Note: Cover the steamer when steaming the glutinous rice.
*Note: For photo purpose, I have removed the cover to snap a picture. Please do cover the steamer during the steaming process.

- Then, remove the cover and use a chopstick to stir and mix in order to loosen the rice.

- Use the back of a rice scooper to smoothen the rice again and place the Chinese sausages on top. Continue to steam the glutinous rice (coverred) for another 20-25 minutes or until the rice is cooked. (Note: I steamed for 25 minutes.)

- While the steamer is steaming the glutinous rice, you may work on the chicken and mushrooms.
- In a pot, heat up 1-2 tablespoon of cooking oil, then put in the chicken pieces and mushrooms. (Note: Keep the marinade for later use.)
- Stir fry them until the chicken pieces are almost cooked. Then, add in half the marinade that used to marinade the chicken and mushroom and add about 1 tsp of salt and 2 tsp of soy sauce. Continue to cook until the chicken are completely cooked.

- When the glutinous rice is cooked, remove the rice and the Chinese sausages from the steamer. Thinly slice the Chinese sausages and set them aside for later use.  

To assemble the Loh Mai Kai:-
 
- Lightly greased the bowls with little bit of cooking oil.
- Plase 1 mushroom, 2 pieces of chicken, 2 or 3 slices of Chinese sausages and about 1 to 1.5 tbsp of the cooked chicken and mushroom sauce into each of the greased bowls.
- Then, put in the cooked glutinous rice and pressed firmly to cover the fillings as per the photo below.
- Return all the bowls of sticky rice in the steamer and steam over medium high heat for about 30 minutes.
- Then, your Loh Mai Kai are ready to be served!!!
**Use a plastic knife to cut around the edges, invert the bowl and pour out the Loh Mai Kai..
Hope you all enjoy making them at home! :) My boys love it especially my 11 year old kiddo. He ate 2 Loh Mai Kai like mum and dad now! o_O He was delighted and so happy that he could bring this to school for lunch the next day when there's balance which we couldn't finished.


Tuesday, November 22, 2016

Lemon Chiffon Cake(柠檬口味戚風蛋糕 / 柠檬口味雪芳蛋糕)


I was really busy for the past few days :(  but I need to bring a supper for sharing after church meeting last Saturday. Since I haven't gotten much time to think, I decided to bake a lemon chiffon cake, i.e. one of my all time favourite since I have some free lemon from my friends' tree!  

Okay, let's talk about the processes!!

Get ready 2 mixing bowl and the following ingredients...

(A) 6 egg yolks, 75g cooking oil, 90g fresh milk, 109 or 110g cake flour or low protein flour (低粉/低筋面粉), about 4 tbsp fresh lemon juice, 1 tsp lemon rind, AND 3-4 drops of lemon essence if you wish (optional).

(B) 6 egg whites, 0.5 tsp cream of tartar, about 140g - 150g icing sugar (yes, I use icing sugar...)
(Note: you need more icing sugar than the original flavour as the lemon juice will reduce the sweetness of the cake very much. I have tried putting around 125g icing sugar, but I just felt not sweet enough. Just needed a little more. Hence, I suggest 140g - 150g icing sugar will be great. However, if you know that the lemon juice you have is really sour, I would think 150g icing sugar will be better. If not, you can adjust by adding slightly more than the recipe after tasting a little of the (almost ready) meringue.)

** Use large eggs. However, if the eggs are medium large, then add 1 extra egg to the recipe. Meaning, the recipe becomes 7 egg yolks and 7 egg whites.

Steps for egg yolks batter (A)...
- Combine egg yolks with oil. Mix well.
- Add in fresh milk. Stir well.
- Sift in flour. Stir until smooth (well combined). 
- Add in the lemon juice, the lemon rind and the optional lemon essence. (Note: You can omit lemon essence it you don't want to.) Mix well.
* Put aside the egg yolks batter and let it rest.


While the egg yolk batter is resting, let's move on to work on ingredient (B) ie the egg whites...

Steps:-
- Combine egg whites and cream of tartar and whisk with high speed until just frothy. Note: Must do it in one direction only! (- Add in 1/3 of icing sugar. Continue to whisk with high speed until well mixed (doesn't take long)
- Quickly add in another 1/3 of icing sugar and continue to whisk with high speed until combined.
- Add in the balance icing sugar and continue to whisk evenly until stiff (ie the meringue can form a small peak like the 4th quarter photo below) and will not fall off the mixing bowl when inverted...
(Note: To test whether the meringue is ready, you need to test few spot of the meringue eg. the middle, the left, the right, the north and the south. It is ready for next step if each part tested gave the same peak  pointy look like the 4th quarter photo below.)

Final steps:
- Put 1/3 egg whites meringue into the egg yoke batter. Fold gently with spatula to combine the meringue with egg yolk batter. Gently... Don't rush.

- Then pour this batter into the balance egg whites meringue. Fold gently until just combine. Remember: Don't over do it. Otherwise, you will deflate the meringue...
- Pour the ready batter into an ungreased 22-25cm chiffon cake baking tin
- Pat gently around the baking tin to remove the air / small bubbles that were captured during whisking

- Bake in preheated oven at 160 degree C for about 55min until cooked and light golden brown. (Tip: use a tooth pick to test whether it is cooked)
- Remove from oven. Quickly pat GENTLY around the baking tin and invert it immediately to let it cool. (Note: I find that pat gently around the baking tin before inverting works for me. If you live in countries where there are 4 seasons weather, I suggest you need to do this essential step. During my inital learning, my chiffon cake somehow sank regardless of how well and how pretty the cake came out from oven. However, after discovering this tips, my chiffon cake seems to look okay everytime I bake. No more sinking cake after cooling! Yes!)

- Be patient. Let it cool down completely before removing from the baking tin and cutting to serve.

*I find that this is the best way to cool my chiffon cake. :)


Sunday, November 20, 2016

Apam Balik The Malaysian Pancake (煎弄包 / 面煎糕)

Crushed peanuts fillings apam balik


Creamed corn, crushed peanuts and sesame seeds apam balik..

Since I wish to share about apam balik, I made them yesterday morning for my children as snack after having breakfast. This snack is best to eat when it is hot/warm, but it is not too bad when you have to eat it cooled.

Here's the recipe I used to make my pancake (apam balik)....It made about 2.5 pancakes which you could cut 3 bigger pieces per pancake (or cut 6 smaller pieces if going to share in a gathering).
(Note: Depending on how many people you wish to make them for, please do adjust the recipe upward accordingly...)

The batter:-
- 150g self raising flour
- 1 egg
- 2 tsp sugar
- 0.5 tsp soda bi-carb
- 0.125 (ie. 1/8 tsp) yeast
- about 200 ml water

Method:
In a mixing bowl,  put in all the above ingredients until well mixed. Then, place it in the fridge and let is rest for about 30 minutes. (Note: Referring to the first 2 photos below. Some recipe said rest for minumum of 20 minutes. I find it not ideal. Best is to rest for about 30 minutes. I have tried 45 minutes resting time as I was busy doing something else...No problem as well. :) )
Note: the 4th photo - spreading fillings evenly all over the pancake
OR putting fillings in the middle of pancake for easier folding afterwards...

Now, about the making of the pancake (3rd, 4th and 5th photos above):-
- Heat up the non-stick pan .(Note: do not put any cooking oil or butter to grease the pan.)
- Pour in some batter. (Note: about 2-3 scoop batter depending on how big is your scoop and your non-stick pan.)
- Then, slightly spread the batter (evenly) with the back of the scoop. (Note: Do not spread too much if you like the thicker texture apam balik.)
- Turn the heat to medium (or medium low) and let the batter cook until you see the "bubbles" spreading around the pancake.
- Next, put in your favourite fillings...Easier to manage if you put the fillings in the middle of pancake as some fillings will drop out when folding the apam balik into half. However, it is also okay to spread the fillings evenly all over before folding the pancake into half.

Here's some suggesting of the fillings for apam balik
** about 1-1.5 tsp melted butter (optional)
** 2-3 tbsp sugar (note: I use 3 tbsp this time.)
** 4-5 tbsp crushed peanuts (note: I toasted my peanuts for awhile with my airfryer at 120 degree C for 4 minutes)
** 1-2 tbsp creamed corn (optional)
** 1 tsp sesame seeds (optional)

- Continue to pan fry the pancake until it is bown enough like the photo below. Fold it into half and it is ready to be cut and serve. ;)
Note: The look of the apam balik after folding into half.
Apam balik, hope you enjoy!!


Wednesday, November 16, 2016

Going Sweet...Slow Cook Sweet Snow Fungus "Soup" With Lily Bulbs (雪耳糖水)

Have been very busy lately with lots of matters. Can't share much here but very tired indeed. All in all, it is just not easy to be parents!!

Made something light for my family today. Simple slow cook sweet snow fungus soup with lily bulbs.
Here's how I made it...

15g snow fungus (white fungus)
20g lily bulbs
10g mixed sweet and bitter almond (南北杏)
6 red dates
85g rock sugar
1.8 litre hot water (Note: I used hot boiled water from my Thermos. Please refer to your slow cooker manual if you are concerned about putting hot boiled water into the slow cooker as some shared that their slow cooker must start off with cooled water. If you use cooled water, then you need to cook it longer.)

Method:

- Rinse the snow fungus, lily bulbs, the almond and red dates. Drain.
- Place all the ingredients into a slow cooker.
- Let it cook at high heat for 0.5 hour. Switch to auto cook function and let the "soup" cook slowly in the slow cooker for about 2 hours. (Note: Unless you are using low heat, do not let the soup slow cook for too many hours as the snow fungus and lily bulbs will become too soft and "thicken" the soup.)

**This round, I use low heat throughout the cooking process. I started around 12.30pm and only switch off my slow cooker around 8pm (as I was out attending to unforeseen matters). I was worried but thank God, still okay! Not too soft and the soup still clear and not thick!

Thursday, November 10, 2016

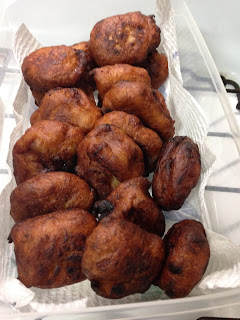
Banana Fritters (Cekodok Pisang)...The Malaysian Way (炸香蕉丸)

I must share the recipe for this wonderful snack. It is actually not hard to make. Pretty simple I should say. Back then, I used to work in Kuala Lumpur, Malaysia. Whenever I took an LRT (train) to work, I could see some street food stores selling this delicious banana fritters. I still remember paying MYR1 for 3 banana fritters? I wonder whether I have remembered it correctly..hmm..

Anyway, here is one of the ways to make this delicious snack:-
 - 6 ripe bananas (note: I used only 5 bananas this round as the bananas I bought were quite big.)
- 120g to 130g plain flour (sifted)
- 4 tbsp sugar
- 0.5 tsp salt
- 3 tbsp desiccated coconut
- 2 tbsp fresh milk
- 0.25 tsp baking powder
(Make about 18-20 banana fritters.)
Method:-
- Lightly mash the bananas (Note: If you mash too much, bananas will become "watery".)
- Add in the rest of the ingredients and mix well.
Now the frying part...
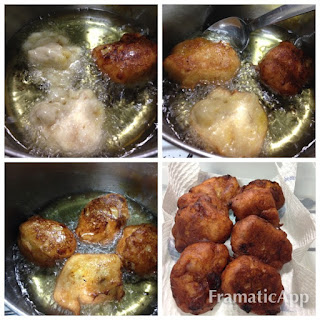
- Heat up the cooking oil at high heat.
- Scoop a tablespoon of batter and drop it into the hot oil. Reduce heat to medium and fry/deep fry it until golden brown.
- Serve hot.
Note: During the frying process, avoid using high heat as the banana fritters will be over fried / turned black / burnt very fast.

Tips: How much cooking oil for deep frying? Some uses 5 cups of cooking oil but I don't think it is necessary!! Depending on how big is your pot / wok, just make sure that it could cover at least half the height of the batter you drop into the hot oil. I was using a small pot to fry my banana fritters this time as I didn't want to use too much of cooking oil, and I wanna take photos for the blog! Better control before my banana fritters turn brown..lol...

Tips2: If you are not eating it right away or you have left over, you could air fry them for awhile the next day at about 140 degree C for about 4 minutes (i.e. reheat), so that you could eat them warm/hot.


Tuesday, November 8, 2016

Chinese Savoury Rice Pudding with Preserved Raddish (碗仔粿 "woon-zai-gou"/水粿 "zhui-kueh")

Ah...Anyone likes to eat this kueh / rice pudding? This kueh / rice pudding is used to be one of my favourite breakfast option as well. My mum used to get it from the market in the morning when she went out marketing. It wasn't expensive then...and we could easily get this kueh in Kuala Lumpur. However, I was surprised to hear from my Penang friends that this kueh was rarely sold in Penang! Hence, they were delighted when I made this kueh to church meeting as it brings back lots of childhood memory! :)

Believe it or not, I do not know how to bake any cakes or kueh and cooking was the least thing I ever do before migrating oversea. I used to be a full time working mum. Had been very busy like many other working adults, striving to earn a living and earn more for the family.

I still remember this kueh during my last day of work before leaving the country. My Division Head bought me this kueh as farewell...Yes, this kueh is indeed hard to get it here, but I am glad that I wasn't afraid to explore recipes. No regrets! Blessed are my friends who have tried my rice pudding from my very first attempts! Thank you for being my food testers in many occasions. And thank you for the encouragements that keep me going / growing!! :)

Here's how I made my rice pudding...This recipe made about 12 bowls of rice pudding.

The batter:
- 450g rice flour
- 1950 ml water
- 3 tbsp cornflour
- 0.75 tsp (ie 3/4 tsp) salt mixed with 6 tbsp cooking oil and 1.5 tsp alkaline (lye) water (碱水) (Note: some people omit lye water.)

Preserved raddish topping / To serve with...
- about 13 tbsp cooking oil
- 100g pork mince
-  6 tbsp dried shrimps (finely chopped)
- 15 tbsp preserved raddish (finely chopped) - Choy Poh 菜脯碎  (Note: I used the sweet preserved raddish)
- 6 tbsp finely chopped garlic and shallots
- sugar, salt and pepper to taste (Note: I normally added little bit each time after tasted until I am satisfied with the balance taste of sweetness/ saltiness).
- 1 to 1.5 tsp of cooking caramel
- 0.5 cup of water

Some small bowls (note: about the size of chinese rice bowls)
- Brush little bit of cooking oil inside each bowl

Method:-
1) Mix all the batter ingredients, strain it into a pot. Cook it over low heat by stirring constantly until it turns thick liquid (but not dry and hard).
2) Remove the thick liquid from heat.
3) Fill up each greased bowl with the hot batter until 3/4 quarter full (or slighly less than 3/4 quarter full)
4) Steam with high heat in a steamer for about 25 minutes until cooked. (Note: I am using a cook top steamer. You might need longer time if  you are using an electric steamer)
5) Remove from steamer. Leave cool before cutting.

(The look of just steamed rice pudding. Leaving them cool before cutting.)

(The look of rice pudding after removed from the bowls.)

6) For the topping, heat up about 13 tbsp of cooking oil, saute the chopped garlic and shallots until aromatic. Add in the chopped dried shrimps, stir fry it for about 1 minute before adding the pork mince and the preserved raddish. Continue to stir fry until the pork mince are cooked. Add in the 0.5 cup of water and the cooking caramel. Continue to stir fry for about a minute. Then, add in some sugar, pepper and salt to taste.
7) Once done, serve this preserved raddish topping with the cooled rice pudding.

Bon Appétit!!

Thursday, November 3, 2016

Chinese Pork Jerky (bak kwa) in the house!! (猪肉干)


Pork jerky (bak kwa) in the house!! Can't resist...snapped a few photos for remembrance each time I made it! Hehe...Can't really find this here in Adelaide unless homemade.  Sometimes, in order to satisfy craving but home is far away, the only way to go about it is to learn it!! However, I don't made this often. Just occasionally to satisfy my family.

Thanks to the social media, I remember seeing someone posted a video on youtube on how to make pork jerky. Seems not hard but I took a long while to consider attempting to make it myself. Normally, I won't explore/experiment a new recipe when I was rushing as high chances of disastrous outcome...And I won't attempt sophisticated baking when my hubby is around. He just couldn't stand a "messy" kitchen... :(

I have few recipes in hand about bak kwa but I have tested only 2 of the recipes. My friend recommended the recipe from a blog ie. http://nasilemaklover.blogspot.com.au/2012/01/homemade-chinese-pork-jerky-bak-kwa.html. I can testify that it is delicious!!

My children, you can make this for mummy next time, okay! No excuse not knowing how to make it. But for now, mummy would make it. An occasion treat to you. :) 

Here's how the recipe goes:-

900g pork mince (perferable mixture of fat and lean pork mince)
200g sugar
2 tbsp light soy sauce
1 tbsp Chinese cooking wine (Shao Xing)
2 tsp fish sauce
2 tbsp oyster sauce
1 tsp cooking caramel / caramelized dark sauce
0.25 tsp Chinese five spice powder
1.5 tsp salt
3.5 to 4 tbsp honey
2 or 3 dashes of white pepper
0.5 tsp garlic powder (Optional)

{And Some honey water (for brushing over the pork jerky when it is almost cooked)}

**Note: I made about 19-20 piece with 900g pork mince. Trust me, this is not a lot. Finishes very fast.

Method:-
(1) Put all the above ingredients (except the honey water) in a large mixing bowl. Use a pair of chopsticks to mix and stir the pork mince with the marinate ingredients in one direction until well blend and the mince turns gooey in texture.  OR
(1a) Alternatively, you can put the said ingredients (except the honey water) into a breadmaker and use 1x dough function to help you with the mixing and stirring of pork mince until it turns gooey paste. (Note: We just need the dough function to help us in mixing and stirring. We do not need to wait for proofing. Hence, once the breadmaker stop mixing and stirring, just press stop and remove the pork mince paste for the next step.)(Note: I am using Tesco brand breadmaker. It took around 20 minutes before it stop mixing and stirring.)   

(The look of my breadmaker helping me with the mixing and stirring the pork mince with all other marinate ingredients.)
(The gooey pork mince paste/texture means the correct texture required for the pork jerky.)

(2) Place the gooey pork mince paste in the large bowl, then use a cling wrap to wrap over it. Now, place it in the fridge and let it marinate for about 6 hours or overnight. (Note: I normally marinated overnight.)

(3) To assemble the pork jerky before baking....
-  Place a baking paper on the baking tray and brush /spray some cooking oil on the baking paper to prevent sticking on the paper during baking.
-  Scoop 2 scoops of the gooey pork mince and place it in the middle of the greased baking paper. (Note: I normally use a rice scooper to help me with this.)
-  Now, use a cling wrap to place on top of the pork mince and start spreading the gooey paste (with either your finger, the back of a spoon or a rolling pin) evenly until the desired thickness before putting them into oven. (Note: REMEMBER to remove the cling wrap before baking!!)
**I prefer the thickness of closed to 0.2cm thick for pork jerky. Personally, I prefer not too thin because it doesn't look nice / too right somehow... 

The look of spreading the pork mince paste on the greased baking paper on a baking tray with the help of cling wrap! Once evenly spreaded the mince paste, remove the cling wrap(s) before baking.

(4) The baking part...
- Preheat oven. Use top & bottom fan. Bake at 160 degree C for about 20 minutes
- Remove from oven, cut into desired shape, and return the pork jerky into oven.
- Bake further at 230 degree C for another 15 min to allow the pork jerky to look better in terms of the colour. (Note: Temperature mentioned here is just a guide. It sometimes depends on individual oven. If you are not sure, check your pork jerky at 10 min time or slightly earlier to prevent overcooked or burnt.)
- Remove from oven again. Pre-prepare some honey water (ie. about 1 tsp honey dissolved in about 3 tbsp water). Brush some honey water on the pork jerky and return to oven for about 1-2 min each time. Repeat this 2 times each side.

- You can bake slightly longer if the pork jerky weren't evenly brown or red enough.(Note: Just bake it until the desirable brown or red.)
(The look of my pork jerky / bak kwa - just done!)

My kids can't wait to have a taste of it even before they were ready...The nice aroma from the oven makes them drooling!

Hope you enjoy it! Cheers!

Tuesday, November 1, 2016

Simple Banana Cake - Perfect for breakfast or tea break! (香蕉蛋糕)

I have not had this banana cake (Malaysian way) for a long time. Suddenly crave for it when I saw the recipe book and the picture of it. I could imagine the taste now and how easy it was to get it from the market during those days. Since I was cracking my head thinking of what breakfast to prepare for my boys, I have good reasons to bake this cake if I manage to get some ripe bananas from the shop. I didn't bake it in the morning rush time. I baked ahead last night. ;)

My initial reference for this cake was the recipe from Agnes Chang's baking book but I have added some cinnamon powder to give the cake a boost in flavour. Here's the recipe for the simple banana cake like the above:-

180g butter (Let it soften a little at room temperature)
180g sugar (Depending on whether the bananas you have gotten are riped & sweet, and whether you prefer sweeter cake. You may want to add slightly more sugar than this recipe.)
2 eggs (I used L size eggs)
4 ripe bananas (coarsely mashed)
3 tbsp fresh milk mixed with 1 tbsp lemon juice (ie. to make sour milk)
(A) - 240g plain flour, 1 tsp baking powder, and 1 tsp baking soda (mix them and sifted together)
2 or 3 dashes of cinnamon powder (optional)

Method:-
- Prepare a bread loaf size baking tray (25cm x 15cm). Cut and put in the baking paper and lightly grease it. Set aside.
- Cream the butter and sugar with a cake mixer untill creamy. Then add eggs one at a time, creaming well after each egg.
- Mix in the mashed bananas, sour milk, the flour mixture (A) and the cinnamon powder
- Once done, pour the batter into a greased and lined baking tray.
- Bake the cake in a pre-heated oven at 180 degree C for about 20 - 30 minutes untill cooked and golden brown. (Note: Depending on individual oven. Some needed longer time to bake. Use a skewer or toothpick to check whether the cake is cooked especially middle part. Poke in the skewer or toothpick, and if it comes out clean when you pull out of the cake, then it means cooked! However, if the skewer or toothpick comes out sticky, you got to leave it bake longer in your oven.)
- Once done, remove the cake from the oven. Let it cool before slicing and serving. (Note: Unlike chiffon cake, this cake does not need to invert over for cooling.) 

Enjoy!